

Creating an app has never been easier, thanks to advancements in artificial intelligence and user-friendly platforms like Google Gemini. This guide will walk you through the process of building a basic app using Google Gemini, emphasizing the steps involved, the tools available, and tips for optimizing your app development experience. Whether you're a seasoned developer or a beginner, this comprehensive guide will help you navigate the app creation process with ease.
 Google Gemini App
Understanding Google Gemini
Google Gemini is an innovative platform designed to simplify app development. It leverages natural language processing to allow users to describe their app ideas in plain language, which the system then translates into a functional app structure. This approach eliminates the need for extensive coding knowledge, making app creation accessible to a broader audience.
Key Features of Google Gemini
- Natural Language Processing: Users can describe their app ideas in everyday language, and Gemini interprets these descriptions to generate app structures.
- AI Assistance: The platform provides intelligent suggestions and modifications, enhancing the app development process.
- Cross-Platform Compatibility: Apps created with Gemini can be deployed on various platforms, including web and mobile.
Getting Started with Google Gemini
Before diving into app creation, you need to set up your Google Gemini account and familiarize yourself with the interface.
Step 1: Sign Up for Google Gemini
- Visit the Google Gemini Website: Navigate to the official Google Gemini page.
- Create an Account: Click on the sign-up button and fill in the required information to create your account.
- Verify Your Email: Check your email for a verification link and follow the instructions to activate your account.
Step 2: Access the App Creation Interface
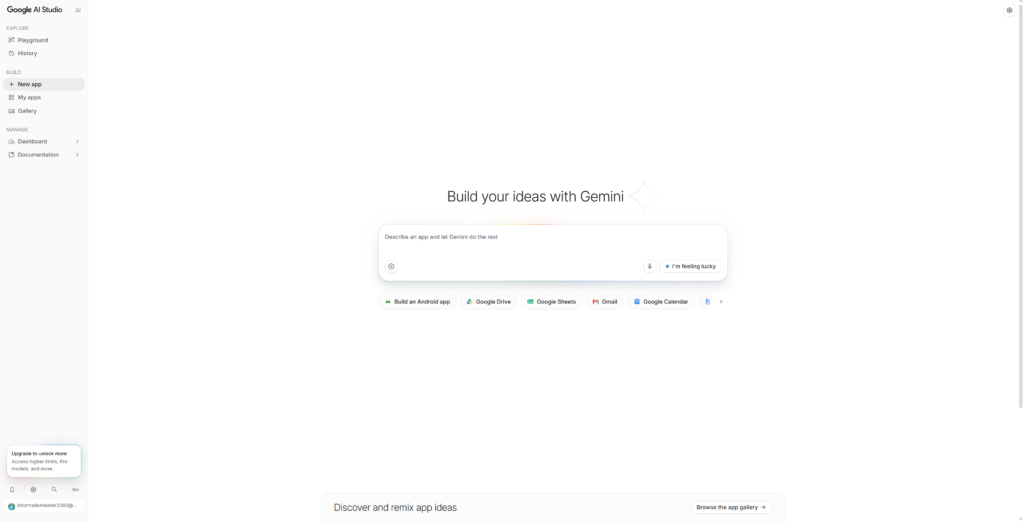
Once your account is set up, log in to Google Gemini and access the app creation interface.
 Google Gemini Dashboard
- Dashboard Overview: Familiarize yourself with the dashboard, which displays your existing apps and options to create new ones.
- Select 'Create App': Click on the 'Create App' button to start the app development process.
Describing Your App Idea
The first step in creating your app is to describe your idea or the business process you want to automate. This is where Google Gemini's natural language processing shines.
Step 1: Input Your App Description
- Use the Prompt Box: In the app creation interface, you will find a prompt box where you can type your app idea.
- Be Detailed: Provide as much detail as possible. For example, instead of saying "I want an inspection app," you might say, "I need an app to manage facility inspections, where inspectors can log their findings, and reports can be generated weekly."
Step 2: Review the Generated Structure
After submitting your description, Google Gemini will generate an initial app structure based on your input.
- Examine the Tables: The app structure will include tables for data management. For instance, your inspection app might include tables for
Inspectors,Reports, andFacilities. - Check the Columns: Each table will have associated columns that define the data attributes. Review these to ensure they align with your app's requirements.
Customizing Your App Structure
Once you have the initial app structure, it's time to customize it to better fit your needs.
Step 1: Edit the App Structure
- Modify Tables and Columns: You can add, edit, or delete tables and columns as necessary. For example, if you need to track additional data points, you can add new columns to the
Inspectionstable. - Add Relationships: Establish links between tables to create a relational database. For instance, linking
Inspector Idin theInspectionstable to theInspectorstable.
Step 2: Incorporate Additional Features
- Add Functionality: Consider what additional features your app might need. This could include user authentication, notifications, or data visualization tools.
- Utilize AI Suggestions: Google Gemini may provide suggestions for features based on your app description. Review these and implement any that enhance your app's functionality.
Creating and Customizing Your App
With your app structure in place, you can now create and customize your app.
Step 1: Create the App
- Click 'Create App': Once you are satisfied with your app structure, click the 'Create App' button to generate the app.
- Access the App Editor: After creation, you will be directed to the app editor, where you can further customize the look and feel of your app.
Step 2: Customize the User Interface
- Design the Layout: Use the app editor to design the user interface. You can choose different layouts, colors, and themes to match your branding.
- Add User-Friendly Features: Incorporate features that enhance user experience, such as intuitive navigation, search functionality, and responsive design.
Testing Your App
Before launching your app, it's crucial to test its functionality to ensure everything works as intended.
Step 1: Conduct User Testing
- Invite Test Users: Share your app with a small group of users to gather feedback on usability and functionality.
- Collect Feedback: Encourage testers to provide feedback on their experience, noting any issues or suggestions for improvement.
Step 2: Make Necessary Adjustments
- Address Feedback: Based on the feedback received, make any necessary adjustments to improve the app's performance and user experience.
- Test Again: Conduct another round of testing to ensure that all changes have been implemented correctly.
Launching Your App
Once you are satisfied with your app's performance, it's time to launch it to the public.
Step 1: Prepare for Launch
- Finalize Settings: Review all app settings, including privacy policies, user permissions, and data management protocols.
- Create a Marketing Plan: Develop a strategy for promoting your app to your target audience. This could include social media campaigns, email marketing, or partnerships.
Step 2: Launch the App
- Publish Your App: Once everything is in place, publish your app on the desired platforms, such as Google Play Store or the web.
- Monitor Performance: After launch, monitor your app's performance and user engagement to identify areas for improvement.
Post-Launch Considerations
After launching your app, it's essential to continue refining and updating it based on user feedback and technological advancements.
Step 1: Gather User Feedback
- Encourage Reviews: Ask users to leave reviews and feedback on their experience with the app.
- Analyze Usage Data: Use analytics tools to track user engagement and identify popular features or areas that may need improvement.
Step 2: Plan for Updates
- Schedule Regular Updates: Plan for regular updates to fix bugs, add new features, and improve user experience.
- Stay Informed: Keep up with the latest trends in app development and user preferences to ensure your app remains relevant and competitive.
0 Comments